

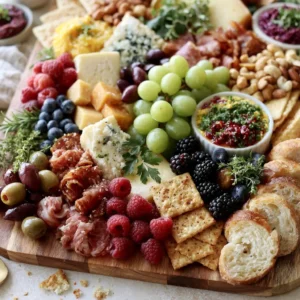
There is something lovely about setting out a board full of colorful bites and letting everyone graze at their own pace. These Summer Picnic Grazing Board Ideas are easy to build, cheerful to serve, and perfect for relaxed outdoor meals with family and friends.
Summer Picnic Grazing Board Ideas
Equipment
- 1 Large serving board, tray, or platter or a shallow basket lined with parchment
Ingredients
- Fresh fruit such as strawberries, grapes, blueberries, melon, or pineapple
- Cheese such as cheddar, gouda, mozzarella, or mini cheese cubes
- Crackers breadsticks, or sliced baguette
- Vegetable sticks such as cucumber, carrots, bell peppers, and snap peas
- Hummus yogurt dip, or ranch-style dip
- Turkey slices grilled chicken pieces, or roasted chickpeas
- Mixed nuts seeds, or pretzels
- Fresh herbs such as mint or basil, for a pretty finish
Instructions
- Pick a large serving board, tray, or platter with enough room for a nice variety of foods. A shallow basket lined with parchment also works well for picnics.
- Start with bowls of dip, cheese wedges, and any larger items like bread or stacks of crackers. Spreading these out helps the board feel balanced.
- Add clusters of fruit and piles of vegetable sticks around the larger pieces. Grouping by color makes the board look bright and abundant.
- Tuck in turkey slices, grilled chicken, roasted chickpeas, nuts, and pretzels. These add texture and make the board more satisfying.
- Slide in fresh herbs and fill any open spaces with a few extra berries or crackers. The goal is a full, inviting look without overpacking the board.
Notes
Why You’ll Love This This Dish
This board feels special without being fussy, which is exactly why I reach for it on warm days. You can mix sweet, savory, crunchy, and creamy foods, then arrange everything in a way that looks inviting and feels effortless.
This Dish Ingredients & Substitutions
Use a mix of fresh, ready-to-eat items so the board comes together quickly.
- Fresh fruit, such as strawberries, grapes, blueberries, melon, or pineapple
- Cheese, such as cheddar, gouda, mozzarella, or mini cheese cubes
- Crackers, breadsticks, or sliced baguette
- Vegetable sticks, such as cucumber, carrots, bell peppers, and snap peas
- Hummus, yogurt dip, or ranch-style dip
- Turkey slices, grilled chicken pieces, or roasted chickpeas
- Mixed nuts, seeds, or pretzels
- Fresh herbs, such as mint or basil, for a pretty finish
If you want to switch things up, swap in seasonal fruit, use dairy-free cheese, or choose gluten-free crackers and bread.
Step-by-Step Instructions to Make This Dish
Step 1: Choose your board
Pick a large serving board, tray, or platter with enough room for a nice variety of foods. A shallow basket lined with parchment also works well for picnics.
Step 2: Place the larger items first
Start with bowls of dip, cheese wedges, and any larger items like bread or stacks of crackers. Spreading these out helps the board feel balanced.
Step 3: Fill in with fruit and vegetables
Add clusters of fruit and piles of vegetable sticks around the larger pieces. Grouping by color makes the board look bright and abundant.
Step 4: Add protein and crunchy extras
Tuck in turkey slices, grilled chicken, roasted chickpeas, nuts, and pretzels. These add texture and make the board more satisfying.
Step 5: Finish with small touches
Slide in fresh herbs and fill any open spaces with a few extra berries or crackers. The goal is a full, inviting look without overpacking the board.
Tips for Success
Keep watery fruit, like cut melon, in a separate section so the crackers stay crisp. If you are serving outdoors, chill the ingredients until just before serving and place the board in the shade whenever possible.
For the best look, vary the shapes and colors on the board. Mix sliced items, whole fruit, wedges, and small piles so everything feels more natural and easy to grab.
Variations of This Dish
For a breakfast-style board, add mini muffins, yogurt cups, berries, and granola clusters. For a more savory spread, focus on cheese, turkey slices, olives, cucumbers, and seasoned nuts.
You can also build a dessert board with cookies, chocolate-covered fruit, marshmallow treats, and fresh berries. Another easy option is a brunch-inspired version with boiled eggs, sliced fruit, toast points, and cream cheese.
Serving Suggestions: What to Pair with This Dish
Serve this board with lemonade, iced tea, sparkling water, or fruit-infused water. It also pairs nicely with simple sandwiches, pasta salad, or a chilled soup if you want to turn it into a fuller picnic meal.
Storage & Reheating Instructions
Store leftovers in separate airtight containers in the refrigerator. Keep crackers, bread, and nuts apart from moist ingredients so they stay fresh longer.
There is no reheating needed for this board. If anything was chilled, let it sit for a few minutes before serving again so the flavors taste bright and fresh.
Memories Made Around the Table
Picnic food has a way of slowing everyone down in the best possible way. A board like this invites people to linger, chat, and come back for one more favorite bite.
FAQs
Can I make this board ahead of time?
Yes, you can prep most of the ingredients a few hours ahead. Keep wet and dry items separate until just before serving for the best texture.
What size board do I need?
A medium or large board works well for a small group, while a bigger crowd may need two boards or a large tray. The main goal is to leave enough room for everything to look easy to reach.
How do I keep the board fresh outdoors?
Use chilled ingredients, cover the board until serving, and keep it out of direct sun. If possible, set it on a cooler surface and refill smaller portions as needed.
Can I make it vegetarian?
Yes, simply skip the meat and add more cheese, hummus, chickpeas, nuts, or extra vegetables. It still feels filling and colorful.
Final Thoughts
These Summer Picnic Grazing Board Ideas are simple to assemble, fun to customize, and always a hit at relaxed gatherings. Once you build one, you may find yourself making it all season long.