

This Skeleton Charcuterie Board is such a fun way to make a Halloween party table feel festive without much effort. It is playful, easy to assemble, and perfect for serving a crowd with lots of color and texture.
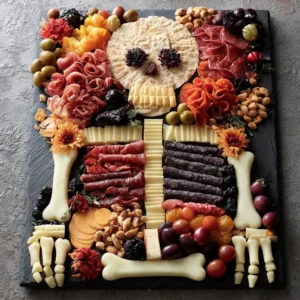
Skeleton Charcuterie Board
Equipment
- 1 Large wooden board or serving tray
- 1 Small bowl for dip optional
Ingredients
Skeleton Charcuterie Board Ingredients
- White cheddar cheese cubes or sliced mozzarella for the skull and bones
- Turkey pepperoni or smoked turkey slices for savory contrast
- Seedless grapes for clusters around the board
- Strawberries for bright color
- Black olives for a bold spooky touch
- Baby carrots for crunch and color
- Cucumber rounds for a fresh green element
- Crackers or breadsticks for the arms, legs, and extra serving pieces
- Hummus or ranch dip for the face details and dipping
- Dark chocolate pieces or chocolate-covered almonds for a sweet finish
Instructions
- Start with a large wooden board, serving tray, or rimmed platter. A wide surface makes it easier to shape the skeleton and spread out the snacks evenly.
- Place a small bowl or scoop of dip near the top center for the skull. Then arrange cheese, crackers, and sliced meats to create the neck, ribcage, arms, and legs. Keep the shape loose and playful rather than perfect.
- Add grapes, strawberries, carrots, cucumbers, and olives around the bones. These smaller items help the board look full and colorful while adding fresh balance.
- Use olives or small dark fruit pieces for the eyes, then tuck in any extra crackers, chocolate, or nuts around the edges. Step back and adjust anything that looks crowded or uneven.
Notes
Why You’ll Love This Skeleton Charcuterie Board
This board looks impressive, but it is really just a thoughtful arrangement of simple snacks. You can mix sweet and savory bites, use your favorite ingredients, and make it as spooky or as polished as you want.
It is also a great last-minute centerpiece because there is no cooking required. Just arrange everything in the shape of a skeleton and let the platter do the work.
Skeleton Charcuterie Board Ingredients & Substitutions
- White cheddar cheese cubes or sliced mozzarella, for the skull and bones
- Turkey pepperoni or smoked turkey slices, for savory contrast
- Seedless grapes, for clusters around the board
- Strawberries, for bright color
- Black olives, for a bold spooky touch
- Baby carrots, for crunch and color
- Cucumber rounds, for a fresh green element
- Crackers or breadsticks, for the arms, legs, and extra serving pieces
- Hummus or ranch dip, for the face details and dipping
- Dark chocolate pieces or chocolate-covered almonds, for a sweet finish
If you want to switch things up, use grapes instead of strawberries, swap cheddar for gouda, or replace turkey pepperoni with roasted red peppers for a lighter mix. You can also add apple slices, dried apricots, or pretzels to fill out the board.
Step-by-Step Instructions to Make Skeleton Charcuterie Board
Step 1: Choose your board
Start with a large wooden board, serving tray, or rimmed platter. A wide surface makes it easier to shape the skeleton and spread out the snacks evenly.
Step 2: Build the skeleton shape
Place a small bowl or scoop of dip near the top center for the skull. Then arrange cheese, crackers, and sliced meats to create the neck, ribcage, arms, and legs. Keep the shape loose and playful rather than perfect.
Step 3: Fill in with fruit and veggies
Add grapes, strawberries, carrots, cucumbers, and olives around the bones. These smaller items help the board look full and colorful while adding fresh balance.
Step 4: Add the finishing touches
Use olives or small dark fruit pieces for the eyes, then tuck in any extra crackers, chocolate, or nuts around the edges. Step back and adjust anything that looks crowded or uneven.
Tips for Success
Use a mix of textures so every bite feels interesting, creamy, crunchy, juicy, and savory. If you are serving a larger group, choose a bigger board and add extra dips so there is plenty to go around.
For the best look, group ingredients in small clusters instead of scattering them everywhere. That helps the skeleton shape stand out and makes the board easier for guests to browse.
Variations of Skeleton Charcuterie Board
You can make this board sweet by focusing on fruit, cookies, chocolate, and marshmallows. For a more savory version, lean into cheese, olives, nuts, crackers, and sliced turkey.
Another fun idea is to build a kid-friendly board with mini cheese cubes, grapes, pretzels, strawberries, and a yogurt dip. You can also use seasonal produce like apple slices, pear wedges, and dried figs for a fall-inspired version.
Serving Suggestions: What to Pair with Skeleton Charcuterie Board
This board pairs nicely with a warm soup, simple sandwiches, or a big batch of cider-inspired punch made with fruit juice and sparkling water. It also works well alongside other finger foods like stuffed peppers, sliders, or baked dip.
If you are serving it as the centerpiece, set out small plates and cocktail napkins so guests can easily build their own snack mix.
Storage & Reheating Instructions
Charcuterie boards are best enjoyed fresh, but leftovers can be stored in separate airtight containers in the refrigerator. Keep fruit, cheese, meats, and crackers apart when possible so everything stays in better shape.
There is no reheating needed. If the board has been out for a while, discard anything that has been sitting at room temperature too long and refresh the platter with new crackers or fruit before serving again.
Memories Made Around the Table
One of my favorite things about a themed board like this is how it gets people smiling before they even take a bite. It feels creative, a little silly, and very inviting, which is exactly what a Halloween gathering should be.
FAQs
How far in advance can I make a Skeleton Charcuterie Board?
You can prep the ingredients a few hours ahead and store them separately. Assemble the board close to serving time so the fruit stays fresh and the crackers keep their crunch.
What board size works best?
A large cutting board, serving tray, or platter works best. If you are feeding more guests, use two boards or a longer tray so the skeleton has enough room to spread out.
Can I make this board without meat?
Yes, absolutely. Use extra cheese, fruit, nuts, crackers, olives, and dips to create a full and colorful board without any meat.
What dips go well with this board?
Hummus, ranch, whipped cream cheese, and chocolate dip all work well. Choose one savory option and one sweet option if you want more variety.
Final Thoughts
This Skeleton Charcuterie Board is an easy way to make Halloween entertaining feel special without a lot of work. With a little arranging and a few simple ingredients, you get a festive centerpiece that is as fun to look at as it is to eat.