
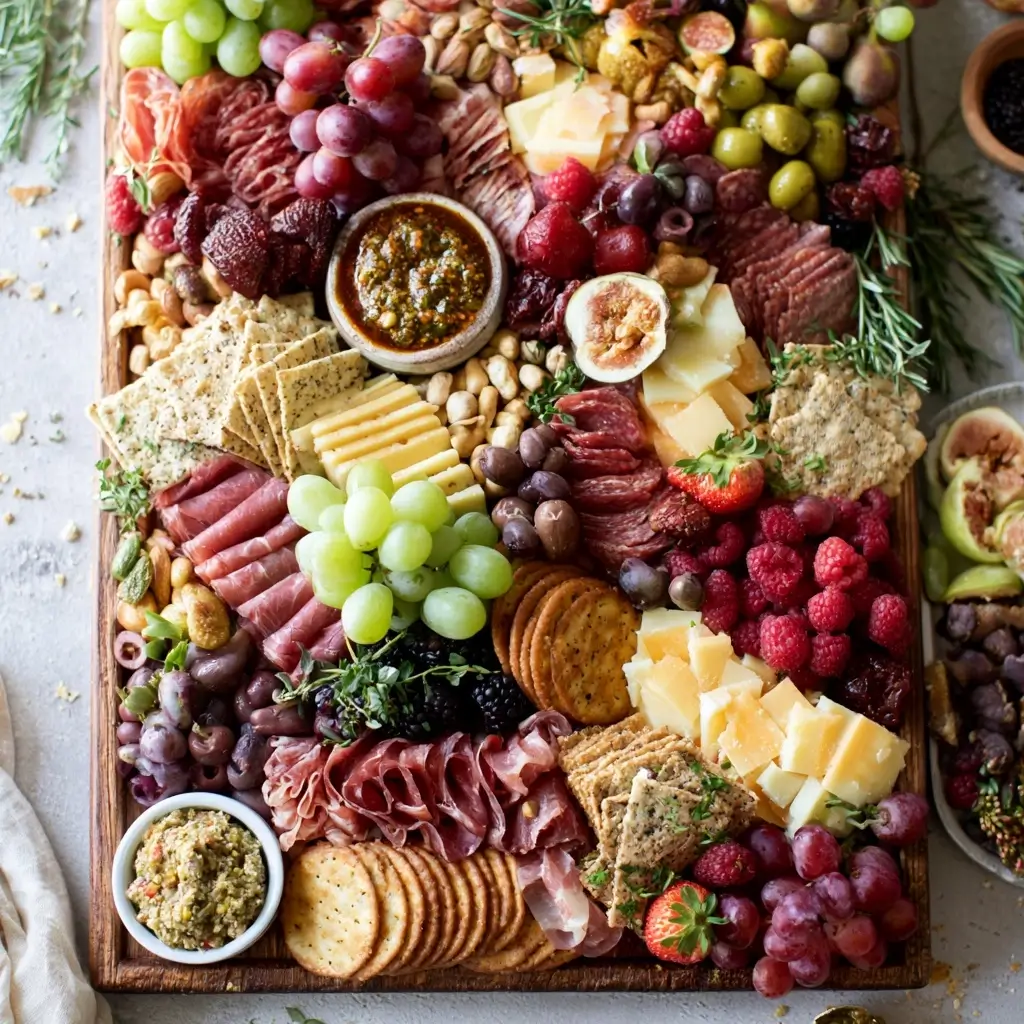
If you have ever wanted to build a beautiful grazing table without stress, this Charcuterie Board Guide will walk you through it step by step. It is all about simple shopping, easy arranging, and creating a board that feels abundant and welcoming.
Charcuterie Board Guide
Equipment
- 1 Large wooden board or serving tray or a clean sheet pan
- 1 Small bowls for honey, jam, and olives
- 1 Cheese knives optional
- 1 Small serving tongs optional
Ingredients
- 8 oz assorted cheeses such as cheddar, gouda, brie, or manchego
- 2 cups seedless grapes
- 1 cup fresh berries
- 2 medium apple sliced
- 1 box crackers
- 1 baguette toasted baguette slices
- 1 cup mixed nuts
- 1 cup olives
- 1 cup grape tomatoes
- 2 tbsp fresh herbs such as rosemary or thyme
- 0.25 cup honey
- 0.5 cup jam or fruit preserves
- 6 oz turkey slices
- 4 oz turkey pepperoni
- 1 cup hummus
- 1 cup stuffed grape leaves
Instructions
- Start with a large wooden board, serving tray, or even a clean sheet pan. A bigger surface gives you room to layer ingredients without crowding them.
- Set down the cheeses, small bowls for honey, jam, and olives, plus any dips or spreads. These anchor the board and help you map out the space.
- Fold or roll the turkey slices and arrange them near the cheeses. Tuck in turkey pepperoni, hummus, or stuffed grape leaves where they help balance the layout.
- Cluster grapes, berries, apple slices, tomatoes, and any other fresh produce in loose groups. Keeping them in small sections makes the board feel full and colorful.
- Fan crackers and baguette slices around the edges and between the main items. Then add nuts and any other crunchy snacks to create texture and interest.
- Slip fresh herbs into open spaces for a polished look. Check for gaps, then add a few extra fruit pieces or crackers if needed so the board feels generous.
Notes
Why You’ll Love This This Dish
This board looks impressive, but it is surprisingly easy to put together. You can mix sweet, savory, creamy, crunchy, and fresh elements so every bite feels interesting and satisfying.
It is also wonderfully flexible. You can scale it up for a party or keep it small for a cozy gathering at home, using whatever is in season and fits your budget.
This Dish Ingredients & Substitutions
Here is a simple mix of ingredients that works well for a grazing table.
- Assorted cheeses, such as cheddar, gouda, brie, or manchego
- Seedless grapes
- Fresh berries
- Apple slices
- Crackers
- Toasted baguette slices
- Mixed nuts
- Olives
- Grape tomatoes
- Fresh herbs, like rosemary or thyme
- Honey
- Jam or fruit preserves
- Turkey slices
- Turkey pepperoni
- Hummus
- Stuffed grape leaves
Substitutions are easy. Swap the cheeses based on what you like, use pears instead of apples, or choose cucumbers and carrots for extra crunch. If you want more protein, add sliced turkey, roasted chickpeas, or hard-boiled eggs.
Step-by-Step Instructions to Make This Dish
Step 1, Choose your board
Start with a large wooden board, serving tray, or even a clean sheet pan. A bigger surface gives you room to layer ingredients without crowding them.
Step 2, Place the larger items first
Set down the cheeses, small bowls for honey, jam, and olives, plus any dips or spreads. These anchor the board and help you map out the space.
Step 3, Add meats and proteins
Fold or roll the turkey slices and arrange them near the cheeses. Tuck in turkey pepperoni, hummus, or stuffed grape leaves where they help balance the layout.
Step 4, Fill in with fruits and vegetables
Cluster grapes, berries, apple slices, tomatoes, and any other fresh produce in loose groups. Keeping them in small sections makes the board feel full and colorful.
Step 5, Add crackers, bread, and crunchy pieces
Fan crackers and baguette slices around the edges and between the main items. Then add nuts and any other crunchy snacks to create texture and interest.
Step 6, Finish with garnish
Slip fresh herbs into open spaces for a polished look. Check for gaps, then add a few extra fruit pieces or crackers if needed so the board feels generous.
Tips for Success
Use a mix of colors and shapes so the board looks lively. Aim for at least one soft item, one crunchy item, one salty item, and one sweet item in every section.
Let cheese sit at room temperature for about 20 to 30 minutes before serving so the flavor comes through better. Also, slice fruit right before assembling to keep it fresh and appealing.
Variations of This Dish
You can make this board themed for the season by leaning into fall apples and figs, winter citrus and nuts, or summer berries and peaches. For a more savory spread, add roasted vegetables, pickles, and extra dips.
If you want a sweeter dessert style board, focus on chocolate, cookies, fresh fruit, and marshmallows. For brunch, include mini muffins, yogurt cups, and breakfast pastries.
Serving Suggestions: What to Pair with This Dish
This board pairs well with sparkling water, fresh lemonade, iced tea, or coffee for a brunch table. For a dinner party, serve it before a simple main dish like roasted chicken, pasta, or soup.
It also works beautifully as the centerpiece for birthdays, showers, game nights, and holiday gatherings. Just add small serving tongs, cheese knives, and napkins so guests can help themselves easily.
Storage & Reheating Instructions
Store leftovers in separate airtight containers whenever possible. Cheese, fruit, meats, and crackers keep best when packed apart so the textures stay fresh.
There is no reheating needed for this kind of spread. If crackers go soft, refresh them with a new batch before serving leftovers again.
Memories Made Around the Table
Some of my favorite gatherings have happened around a grazing table, where everyone lingers a little longer and keeps coming back for one more bite. There is something special about food that invites conversation and lets guests build their own perfect plate.
FAQs
How much food do I need for a grazing table?
A good rule is to plan a little more than you think you need, especially if this is serving as the main appetizer. For a small group, a few cheeses, two fruits, one or two meats, and several crackers usually work well.
What cheeses are best for a charcuterie board?
Choose a mix of textures and flavors, such as a hard cheese, a soft cheese, and a crowd-pleasing mild cheese. Cheddar, brie, gouda, and manchego are all great options.
How far in advance can I assemble it?
You can prep many of the ingredients a few hours ahead, but it is best to assemble the board closer to serving time. Fruit stays fresher and crackers keep their crunch that way.
How do I make it look full?
Group ingredients in small clusters and fill every open space with something edible, such as nuts, herbs, berries, or crackers. A board looks more abundant when the items are packed in closely.
Final Thoughts
This Charcuterie Board Guide keeps things simple while still giving you a beautiful, memorable spread. With a few smart choices and a little layering, you can create a grazing table that feels effortless and special.